Welcome to the Autolab Docs
Rationale
Autolab is a course management platform that enables instructors to offer autograded programming assignments to their students. The two key ideas in Autolab are autograding–that is, programs evaluating other programs, and scoreboards that display the latest autograded scores for each student.
Autograding: The model for a traditional programming class is that students work on their code, hand it in once, and then get feedback a week or two later, at which point they've already moved on to the next assignment. Autograding, on the other hand, allows students to get immediate feedback on their performance and become more motivated to refine their coursework.
Scoreboard: The scoreboard is a fun and powerful motivation for students. When coupled with autograding, it creates a sense of community and healthy competition that benefits everyone. Students anonymize themselves on the scoreboard by giving themselves nicknames. A mix of curiosity and competitiveness drives the stronger students to be at the top of the scoreboard, and all students have a clear idea of what they need for full credit.
Autolab also provides gradebooks, rosters, handins/handouts, lab writeups, code annotation, manual grading, late penalties, grace days, cheat checking, meetings, partners, and bulk emails.
For more of the rationale behind Autolab, please check out this blog post.
Components
Autolab consists of two services: (1) the Autolab frontend which is implemented using Ruby on Rails, and (2) Tango, the RESTful Python autograding server. Either service can run independently without the other. But in order to use all features of Autolab, we highly recommend installing both services.
While the Autolab frontend supports Autolab's web application framework, the backend Tango is responsible for distributing and completing autograding jobs, which run in virtual machines or containers (we currently support Docker and AWS virtual machines). When Tango is done running a job, it then sends the autograded result back to the frontend. Below is a visualization of the typical workflow of the Autolab system.
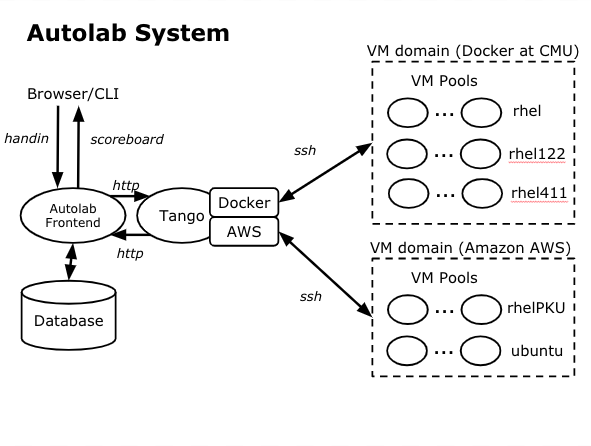
As you can see on the left, the Autolab frontend receives handin files from the clients through either traditional browser interaction or the command line interface (CLI). The frontend then sends the files through http requests to Tango. Tango adds them to a job queue, assigns them to available containers/virtual machines for grading through ssh, and shepherds the jobs through the process. On the right, inside the domain box for Docker at CMU, we show 3 VM pools - rhel, rhel122, and rhel411 - each with potentially different software packages. At the bottom right, we show an example of an AWS VM domain with VM pools rhelPKU and ubuntu. Tango assigns jobs only to the virtual machine instances from their corresponding course’s VM pool. For example, jobs with handin files for the course 122 would only go to rhel122’s instances. Once a job is done, the feedback is copied back to Tango through ssh and sent back to the Autolab frontend through http. The frontend then displays the feedback in the browser or through the CLI. It also updates the scoreboard if applicable and stores the feedback into the database, which is displayed at the bottom left.
Apart from client usage, both the Autolab frontend and Tango provide application programming interfaces (API) for developers. The specific guides are included in the Reference section.
Demonstration Website
Installation instructions can be found in our comprehensive installation guide. If this is your first experience with Autolab, we encourage you to try out some key features on Autolab's Demo Site. Login with the following test credentials
Email address: admin@demo.bar
Password: adminfoobar
The demonstration website refreshes daily and it is publicly accessible. Do not use the site to store important information.
After you have successfully logged in, try the user flow below
1. Create a new course
Click on Manage Autolab (top-right navigation bar) > Create New Course. Fill in the name and semester, and then create to see your course on the homepage. (NOTE: the email doesn't need to be real here)
2. Create an Autograded Lab Assessment.
Go into the course you have just created, click on Install Assessment. You can install a simple autograded lab, called hello lab.
Download hello.tar and install it using the Import from Tarball option.
In the hello lab, students are asked to write a file called hello.c. The autograder checks that the submitted hello.c program compiles and runs with an exit status of zero. If so, the submission gets 100 points. Otherwise it gets 0 points.
Try submitting to the autograded hello lab
- Create and submit a
hello.cfile.#include <stdio.h> int main() { printf("Hello, World!"); return 0; } - Refresh the submitted entries page to see the autograded score appear
- Click on a sub score, in this case the
100.0under theCorrectnessheading, to see the output from the autograder.
For more information on hello lab, or how to create your own lab, go to Guide for Lab Authors! You can also check out other sample autograders on our Autograders repository.
3. Create a PDF homework assessment
Autolab can also handle pdf submissions as well!
Click on Install Assessment, then on Assessment Builder. Name your assessment, and give it a category and click Create Assessment!.
Because it defaults to accepting .c files, we would like to change it to *.pdf. Click on Edit Assessment > Handin and then change the Handin filename to handin.pdf instead of handin.c and save the changes
Try submitting to the pdf homework asssessment.
- Submit a
.pdffile. - Look at your submission using the magnifying glass icon
4. Grading submissions
Click on View Gradesheet, and then the arrow button to open up student submissions. For details on the relevant features for an Instructor, go to Guide for Instructors.