LTI Integration Setup
Autolab supports a limited integration with Learning Tools Interoperability, or LTI. Specifically, Autolab supports LTI Advantage, with support for linking courses on an LTI platform to Autolab in order to pull roster information and sync the member lists of Autolab with the LTI platform. The LTI Advantage integration features have been built to mainly work with Canvas, but it should be possible to integrate with other platforms such as Moodle, though this has not been tested. Please contact us if you run into any issues with the integration process as this feature is still a work-in-progress.
Definitions
- For the purposes of LTI Integration, a "platform" is an LMS such as Canvas or Moodle, while Autolab falls under the "tool" category.
Generate a JWK for your Autolab instance
JSON Web Keys (JWKs) make up the backbone of LTI Advantage's security specification. As part of the LTI Advantage Specification, Autolab requires a public-private keypair of RSA JWKs in order to sign and verify any signatures originating from Autolab towards other LTI platforms. To generate a JWK keypair, you may use a website, or a library such as ruby-jwt. Make sure that you specify that the key use is for signatures, using the RS256 algorithm, and include a key-id. An example JWK keypair is below. Save the keypair for later configuration steps.
Public-Private Keypair:
{
    "p": "_VqrjPDQHEce2zwxnzlBVu_6gZwfwBftu8yX8Q1np7nw9StC16e4oi8vKtTHc6hy-byOU-JyKV0Dj9LZXF_r5_HZlCEVCg9J4oopsINAwi1ekWRWj3pGCJaJ6M9QdWTd3Q0zzWVowdeDmwfWGQKesoM7O4JkxzFRV1w-8GqQYyM",
    "kty": "RSA",
    "q": "jzrFTIhNP80RUzqX4lYESsBjBhkyXY7nSsOJXLtUmie0LG_-aqJ0nSRi5Q4hhDsou3VjMWj-7QvwrgYw4GF5ktlDdEN874TuIRY2LeuWa1WlsYg7QN31G89tPFb7IxlxY9D0KG0Tg3NkXkZ1t2OgQZZeY_uTsY5yJ9e1Zb0Lpec",
    "d": "BSZb18GcM7lo72-sB84aOpUrkfhgmECsWBMfXF9fbIv8jsYt7mc5leduANHSf7aFTS39XQtGZUoZ6DLT2b-DhF2_VJCjm0r2P-YnzHV8QJ9iQKu9tEeclRFR7xeFh0HE39f28n_DKSsvUfkMjPY79Jyw7ctYezLoUJFEP1UI9W1zVbJgRn8GHv438qKGzwJWKWfNVMbNuW9eLLkR5ejPZMts_0cLF3e6JLOZCL2x6yrrqwE8bXehUHDIsVnE-YT0yHWiuNge5YZaicHhQDRqEQZ80KYUzLCecstEPCCyB5UPVP-dhuZhkM0xfadwI61oGFaF5HSNjsW-gjxsE7RIHQ",
    "e": "AQAB",
    "use": "sig",
    "kid": "Nm4-PaiSvgIwk7OlFn0wK_64bt402rsHmu5zz8fTOyE",
    "qi": "PFp5xgEbWmzjgtxHBGvsBxm8YXKUf3xhm3fpBiXYIZo7LMf7PERQzIWb4amFqq0CBfShYgm9tFwdt2ldIQXvhqY2n3bp-Jp1M5P_YD89FR5-YJLk9PnFfEOEJnD1fqRILMWXUGJxL1YxLMIXXkbbhozrh2-2C-Rku7MFdIMA4UI",
    "dp": "10SkQPQYj_5qHHPP4e9fMkRjwJ7sZ2atjAVyENKIAX6_W0Gv4NdUzRF0bVswQXiegM4SzPm6cKTkst6_63phUsovSmq1mr-U0tT8SUusyZCNKtJrriuBuChY86S7Q5Q542olWt9QnGvHGgIVi1iriRhySsUnZgzkhWsO225gUqs",
    "alg": "RS256",
    "dq": "LKWoTPQMCIBXDzerks03Z0nTVFpUXd-m76JGVla6x5bqzhNXHkxnx3hJL5eZEQwT5WNxOTy-gov_SW_6mmcoK4N4SGylLFCmnj-7QdM3P1wiW1XZCp5lwnaFWZLPlCBhPTksctGVjJtSxSR3m2P915QU9lu8rVN2-D6AeCdW0y8",
    "n": "jb_PoRxF0KaCMASsZwQyZFtoF6X19geXJJsx8QbAcsQEKt8RX34eAueVXn1K49UaGDkK-G9UCDmLDYTKMgjz1mtFKuV2J6CwowplkBq9rE_fUgkSY0XfLC3pCRSaQ6kjwwUjbFjF7tWVQHFhTgjqQ85HA5Pd3ix1yHnMPaNZ08CwucAx1st_WLauEmqdkmfXNIA65S5CO8EXxo94CVJ-DIZ3X7HDJq0m28SRKMR7sPM1q8A3a3z_n7DzIytjRyQkLcCWQq9oLT5dTuvAHz3Hasb1hqGqy9uS3RCFvjXk3GW3JMonVfhJ7310gUCAojEqsQ06vtoLp0g0QsjTUbADlQ"
}
{
    "kty": "RSA",
    "e": "AQAB",
    "use": "sig",
    "kid": "Nm4-PaiSvgIwk7OlFn0wK_64bt402rsHmu5zz8fTOyE",
    "alg": "RS256",
    "n": "jb_PoRxF0KaCMASsZwQyZFtoF6X19geXJJsx8QbAcsQEKt8RX34eAueVXn1K49UaGDkK-G9UCDmLDYTKMgjz1mtFKuV2J6CwowplkBq9rE_fUgkSY0XfLC3pCRSaQ6kjwwUjbFjF7tWVQHFhTgjqQ85HA5Pd3ix1yHnMPaNZ08CwucAx1st_WLauEmqdkmfXNIA65S5CO8EXxo94CVJ-DIZ3X7HDJq0m28SRKMR7sPM1q8A3a3z_n7DzIytjRyQkLcCWQq9oLT5dTuvAHz3Hasb1hqGqy9uS3RCFvjXk3GW3JMonVfhJ7310gUCAojEqsQ06vtoLp0g0QsjTUbADlQ"
}
Set up Autolab as a tool on the LTI platform
In order for Autolab to interface with LTI platforms, it will need to have a client_id generated for it by the platform.
Canvas sometimes calls their client_ids as "developer keys".
Generating a client_id on Canvas
To generate a developer key, follow the guide provided by Canvas and the instructions below. NOTE: You must be a Canvas Administrator in order to generate a developer key.
During the process, fill in the JSON below with your Autolab domain, and also include your public JWK generated in the previous step. Then, in the step "Select Configuration Method" use the "Paste JSON" method and paste in this JSON object.
Save your configuration, and then save the client_id generated by Canvas. This will be used to fill in the configuration file
on Autolab's end as well.
    {
      "title": "Autolab Integration",
      "description": "Autolab is an open-source autograding service developed by students, for students",
      "oidc_initiation_url":"https://<your-autolab-domain>/lti_launch/oidc_login",
      "target_link_uri":"https://<your-autolab-domain>/lti_launch/launch",
      "scopes": [
        "https://purl.imsglobal.org/spec/lti-nrps/scope/contextmembership.readonly"
      ],
     "extensions":[
        {
          "tool_id": "autolab-integration",
          "platform": "canvas.instructure.com",
          "domain": "<your-autolab-domain>",
          "privacy_level": "public",
          "settings": {
          "text":"Launch Autolab Integration",
          "icon_url":"<your-icon>",
            "placements": [
              {
                "text":"Autolab",
                "enabled": true,
                "placement":"course_navigation",
                "message_type": "LtiResourceLinkRequest",
                "target_link_uri": "https://<your-autolab-domain>/lti_launch/launch",
                "icon_url":"<your-icon>",
                "windowTarget": "_blank"
               }
            ]
          }
        }
      ],
      "public_jwk":{
        "kty": "RSA",
        "e": "AQAB",
        "use": "sig",
        "kid": "vLkAvsYBQk5KF3lRxYaUgOWodo_-PL5WrzKLNMcwke0",
        "alg": "RS256",
        "n": "iHN9QvbOTCTlyQwiyUKCAF5iLyAMGPZSnS46okSH5EZv0k3B65k0DdQr8b454RfwOABp7FgXKOEG4oMG62GiFoWebf1nKVBF5O80QOHZquTZLXYPMBKW9FVB0oDol-pzzNmqX0iDPBnCsoII3S8_sDn5V4ur3LUKM2j7oBBphhAPiin8Oh64gnAPS5nlnJmaV8VIbOdpQgzLLHPH4jIfjFhvIKzwRf1kqQGZsUaGYhrGZTusPOLJ0nBHlNh5cEEjbfp0oEvsNJoMzF0COZaMt2d89G7-oaVE64vcEc4rRbW4g1nL4NbeO8xh1Vkhp4rsqL8Zw__DHNue-8kJQt2LUw"
      }
    }
Add Autolab to your Course on Canvas
Once Autolab has been configured and a client_id has been generated, Instructors are then able to add Autolab via the client_id.
Go to "Settings", and click on the "Apps" tab, then click on "+ App". Select Configuration Type "By Client ID", and paste in the client_id generated in the
previous step.
You should receive a confirmation pop-up similar to
"Tool "Autolab Integration Tool" found for client ID
. Would you like to install it?"
Click "Install". Refresh your Course page and Autolab should appear on the Course Navigation Panel on the left-hand side.
Set up Autolab's LTI configuration settings
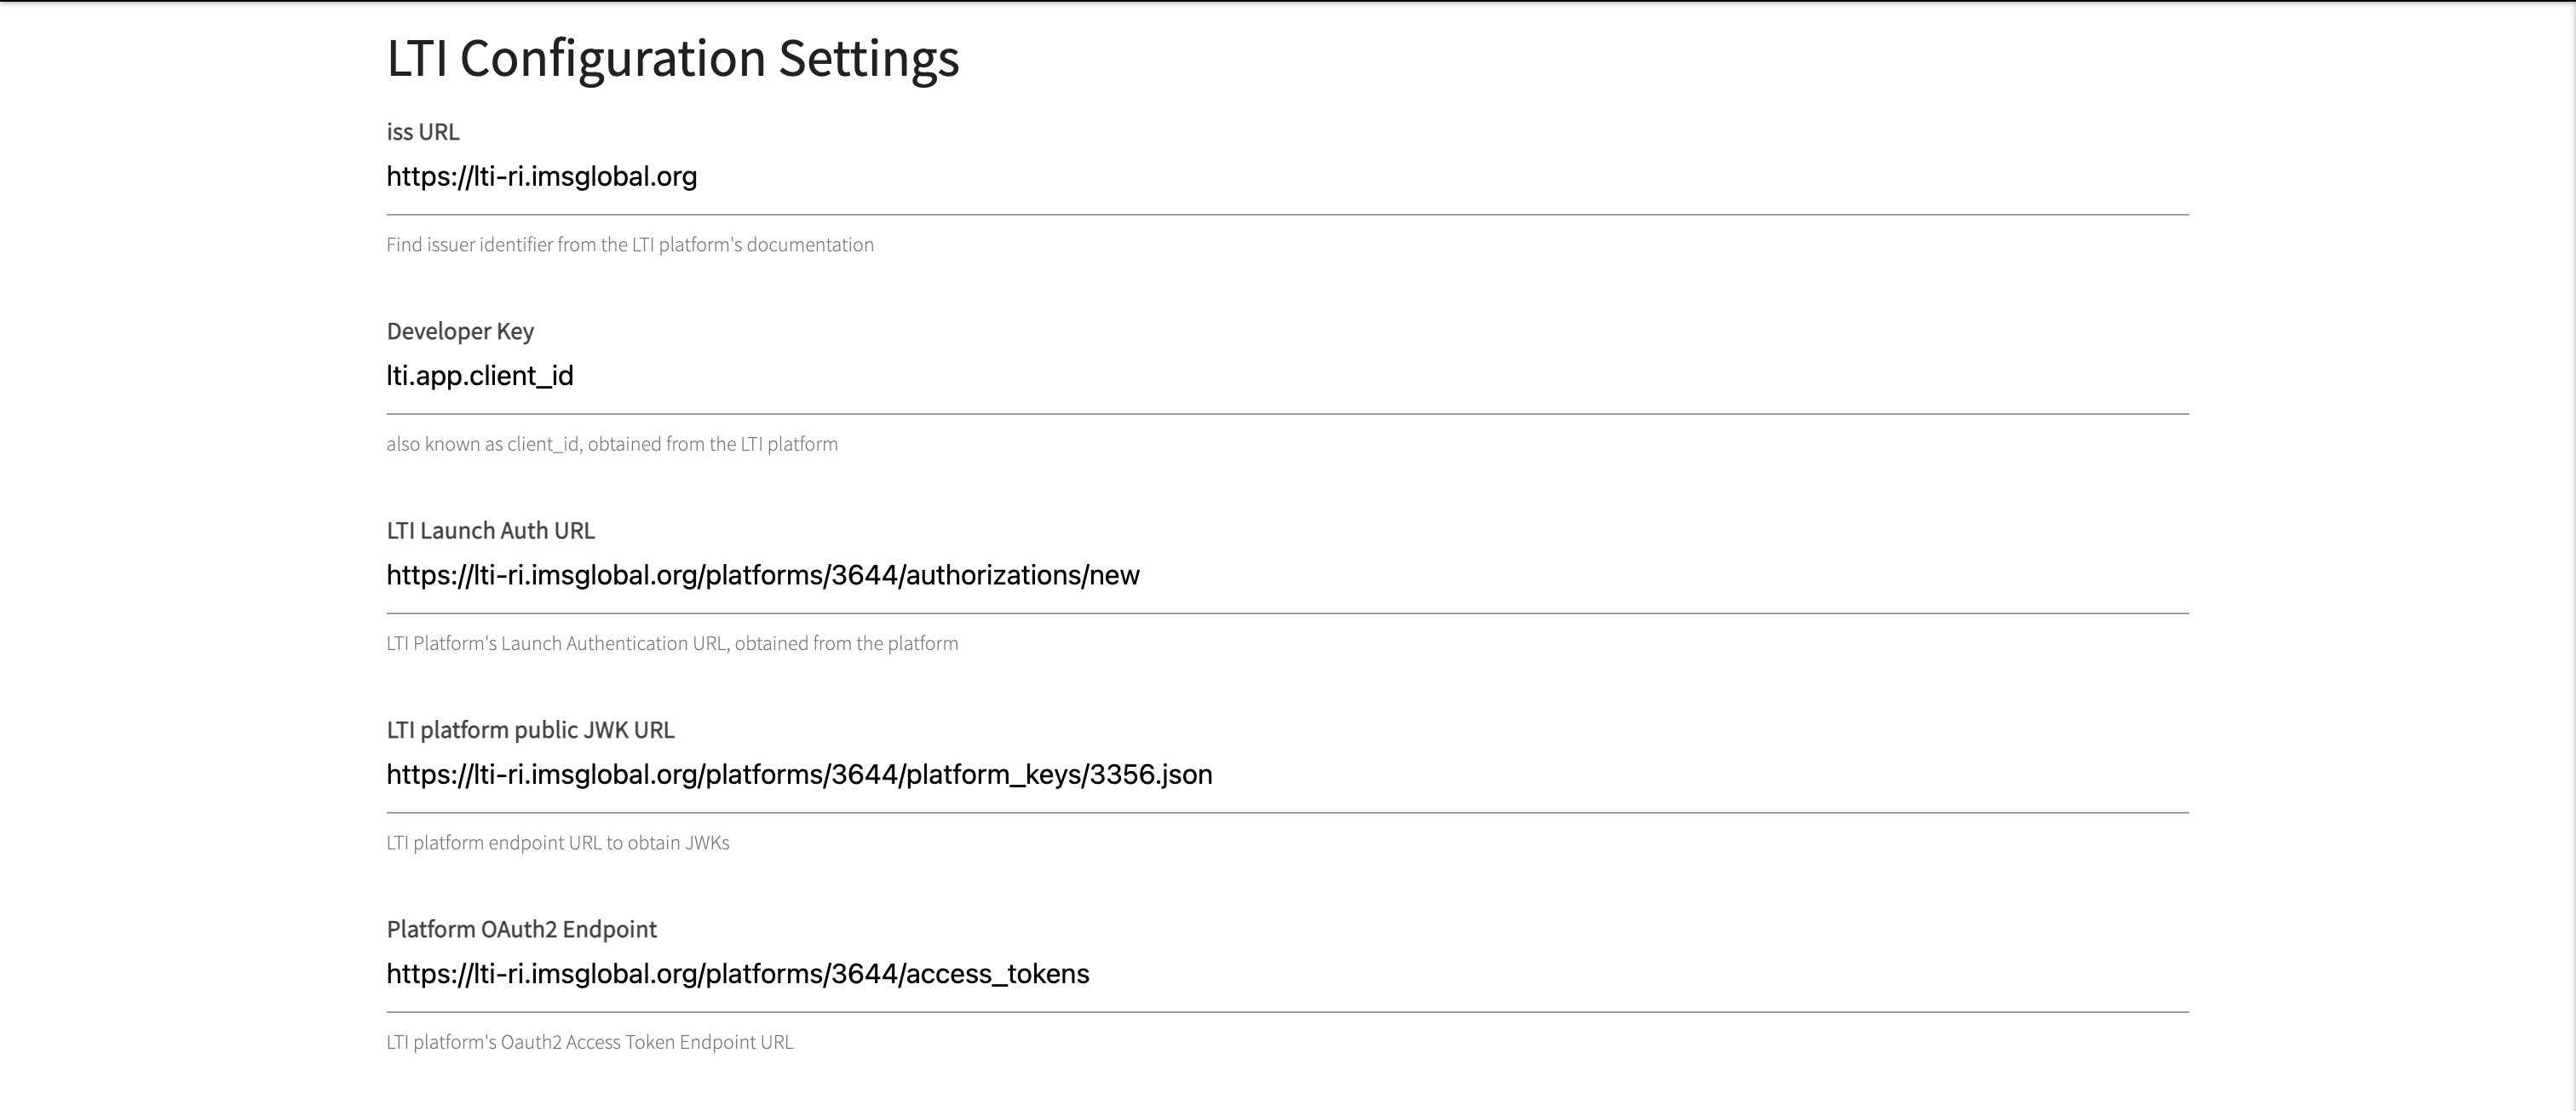
Setting up Autolab to function as an LTI Advantage Tool requires setting up the LTI Tool Configuration specified in the "LTI Configuration Settings" Page.
-
Go to "LTI Configuration Settings" via the "Manage Autolab" Dropdown or by navigating to
/lti_config/indexThe "LTI Configuration Settings" should look like the following image. Here, Admins are able to specify a single LTI platform which they can link with.
-
Fill in the text-fields with your platform-specific information. For example, you should paste in the
client_idcreated by your platform into the "Developer Key" field. To find the right values for "iss URL", "LTI Launch Auth URL", "LTI platform public JWK URL", and "Platform OAuth2 Endpoint", please consult your respective platforms' guides on LTI integration. For example, for Canvas please consult "Configuring Canvas in the Tool" on this page.A summary of some of the values needed for configuring a Canvas integration in Autolab are provided below:
- iss URL:
https://canvas.instructure.com - LTI Launch Auth URL:
https://<your-canvas-domain>/api/lti/authorize_redirect - Platform OAuth2 Endpoint:
https://<your-canvas-domain>/login/oauth2/token - LTI platform public JWK URL:
https://<your-canvas-domain>/api/lti/security/jwks
There is a choice of using the "LTI platform public JWK URL" field or uploading a public JWK as a JSON file field, depending on which is defined in the Configuration. However, it is highly recommended to use "LTI platform public JWK URL" as most platforms use multiple private keys to sign their JWTs, which is not supported when using the file upload method. Therefore, Autolab will default to using "LTI platform public JWK URL", even if a platform public JWK is uploaded.
- iss URL:
-
Upload Autolab's private JWK as a JSON file in the "Upload Autolab's JWK as a JSON file" field. The format of the JWK is shown in the sample below:
{ "p": "-ZtUu_QDlz9XX218fNCUkGLwggD9-w86WRE5R7uON9W6p7mme8l2z2dOyTTftkiHTee4dN2Cww3c5-EV-6QCiIapPCwbIFQxsXeMNatPjA2IthiqQPUM1R7Rc9KkwRYIBz6J-1sjWsAQlJDM3WOGgabr_VY13KsG6wOPw2lrCF0", "kty": "RSA", "q": "yDAwjdLNfzZXXGK3b_Unmx_jvlCzKqF4ysYVtB6ULg3LgKGLBgGhcYMHnCU2-KeTLRsJYaE8CbigiJaWtC2QfkYbLZ6yU8v8kM5wum7hENEgm8PINbCNxRTTYJM9Y5LTzKnNMPYu1DXUx7iC_TkeAX0Gj-7rKBaTAdmdXvmbieM", "d": "CJYgyd0xavwIjOocVL4lYj2FsdMxRDhu13457a5v3Sq_OCfPMTL5_pzE187DN0eCBSOGUTmTYbsiJVkOeO-cHZoOjsRFIM2hrDPLAjud00a6dPoLNlPNwQ5IQppHXMbP2r7Uq30Y1hXXA7aQMnH0205Wv7bgWVd1yBO-d0LlqgA1jqQx_8XTIOdv3CQgBKOXWtvYhBgrOpUoeozL9xm2qbl3bjwvr1cniaJhhP_vUNVjphdxpA1aczOr0ZYJNebwrEoNndnEGlIYr0MkQmatnGmw-al5cn20_DhGgzmxykwXMYfWpt9xM5S7q8DgtC0v-kdh2sF3-KPW5yIwXL-NqQ", "e": "AQAB", "use": "sig", "kid": "PdwZOKsxtweAiBua4y_aBYmKfMe8L2dBj60AmhzR0bw", "qi": "q82CtY2kzU_k-EaIeaEsJ6mTaG0YgKHtAmLohY5GQSOgYPMnvN7vLSCdgilXzVZCmNo4zu5CuHSO7cOhbfPFr2VP9rkNnhxG2bIhfuUOWn5vap2AQz5K6KD9HuRW6h4g8JJR1zL2FtdYkOZArQAEuwg9YDesHk6xUTIKR3pemK4", "dp": "Pe6pnp0UCwIfZsEew0Vpp021STx_yDxmCNV6Ne82gWoZjyZERbCeNyX16XyiCXODhvP4055mpIkbB7nUn4R5UHDBKvnynRnm3pbABk0ERsbQ5gXGsKlczsB_zdI1KOeThGCjEefyJMFFG-e1vTTFmgPVyB0M7jzNUaCnmh_c-80", "alg": "RS256", "dq": "q23pBmpxI_ErGqhGog90XTkP1FhTNbyVLkA3McnF5zJVBNBRt1EKKaSljaeozYLjXAr9G6fxO_npL06Vu7IRPLFYcNanq27R2EeQ7XYqMjaEEB-2gZOxtAXDhb5RIcYIrgjy-Gy5aWy3zFhLhAG3mlqwle1pXykFtt3eEAj8kzU", "n": "wzBWqiHbQQn-IXI2xjxkjURHVZb2ROEauJ0eRXiiSN4GeTWp9QEVL5Lo4BZKPM0OtXWbXxdoRjHkhA7m3rVqZZkwHKp6z9ncHIuEk0ep8l_gXL92OJCRWONvhJ7xQ8RihlIsbTLowGSdfDBMGWjOeZRiNqpRLeQKQmCon_RcbZIDDA28f6zZnC59nkxE7SA-MsCpF_JDgPYvzXoBytU2gqif2YRCFZSlgMBX-jqVybeaqjxDq3-IXNVCwpsWSMChU3JyIWm7K6czNbkOEytf9qnMV7yHg9_-n7ty8arTDhN1N4y7yXiM0gQx-UQsZe80Jy0Um6U2UHU2NRfHRrEvdw" } -
Once all settings have been filled in, click "Update Configuration", and the LTI Configuration should be live on the server. it should be possible to launch Autolab from your specified platform, given your configuration is correct.